#homemade

La Sportellina – a Tuscan traditional Easter cake

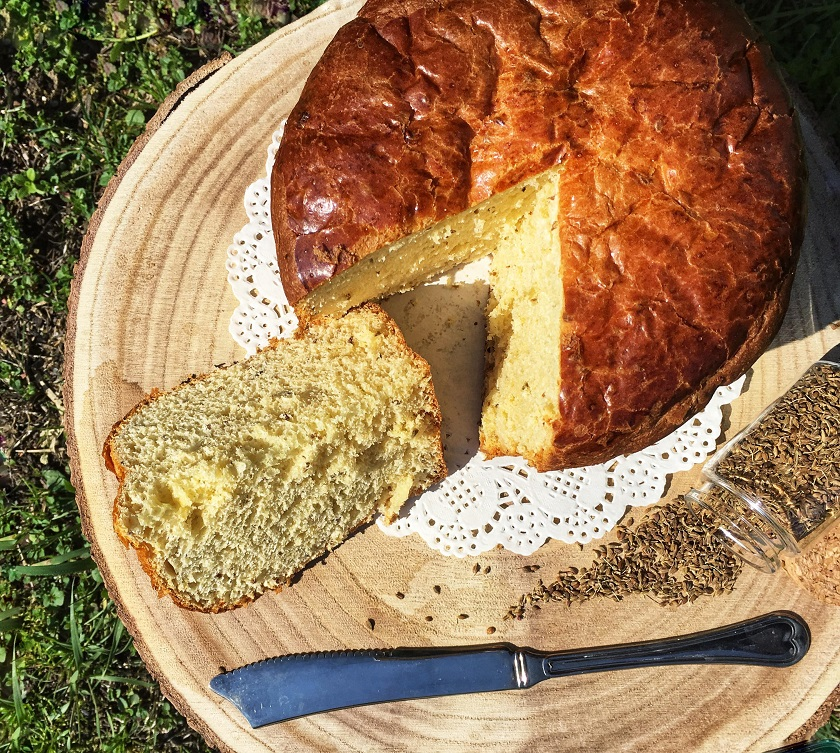
In Tuscany, we have a special sweet tradition, called “la Sportellina” or “schiacciata di Pasqua” (literally the Easter squashed bread). It’s quite a funny name for a cake that looks anything but squashed, I know! But actually the name comes from the great amount of eggs that need to be cracked (squashed) into the batter.

The countryside Easter traditions

The season of Lent in the old days, was by precept a time of fasting and repentance, so people would resort to homemade products only. It was a common and very heartfelt religious tradition, especially in the countryside. Most of the peasant families’ meals consisted of soups, polenta, lots of vegetables from their own farm or just some homemade bread and freshly picked herbs. Adding a pilchard in oil every now and then was a real delicacy that not all could afford. So no wonder on Easter, people would indulge on abundant dishes and plenty of meat, generously soaked by a glass or two of good wine!

The food preparations usually began during the Holy Week before Easter, because everything had to be produced in great quantities, to be shared with families and neighbors as a symbol of gratitude and celebration.

As a child, I remember a great buzz around here, of people going up and down the town’s alleys from early morning until sunset. I could tell Easter was coming just by raising the nose and sniffing the air: suddenly I was engulfed with the sweetest smell of aniseed and freshly baked cake, that used to come from the town’s wood-fired oven. Yes, because at that time, there were no household appliances and not everyone could afford to have their own oven. So during the Easter rush, when women used to prepare lots of oven-baked goods, they had to run up and down the main street with their kneaded doughs to reach the town’s oven when their turn came. Imagine that oven working day and night to bake hundreds of pans of traditional delicacies, which they would take back home once baked. Of course the smell that filled the air back then, was astonishing!

tuscan-traditional-easter-cake

The origins of sportellina cake

You see, the connection between ancient traditions and nature is always amazing, because once again nothing is random: at the beginning of the spring season, hens used to lay more eggs than usual, and they had to be consumed pretty fast, since there were no special storing procedures like nowadays. So this Easter cake – like most of this season’s cakes and dishes – was just the perfect way to consume quite a few eggs.

As I said, our mothers and grandmas used to prepare this traditional cake in large quantities, during the Holy Week. It would take a lot of work and patience to make this recipe, due to the rising and baking times, which were very long. Imagine they had to knead and allow the dough to rise, again and again for no less than 5 times, before baking it! That’s another one of the reasons why these cakes were being made in large quantities. Some pieces were then being wrapped and given to the family’s guests and neighbors, others were being offered to the church, to be served on the way out, after the Holy Mass on Easter day, and a few were being left for breakfast in the days after.

In our days, when everything seems so rushed and we’re always in a hurry, it’s hard to think of dealing with such a long and delicate preparation and of course we all know you can easily find it at the supermarket. What you don’t know is the feeling you get when you dip your hands into that dough and start kneading. You take that moment just for yourself, to clear your mind and let your thoughts run free, while the sweet smell of aniseed and mint liqueur fill your nostrils enough to take you back to your childhood days. It doesn’t matter how long it will take, it’ll all be worth it when you see that precious little piece of dough come up and become brown, making you feel proud for once again having kept the tradition alive.

The Sportellina Recipe:

1,5 kg 00 flour

50 gr. brewer’s yeast

150 ml milk

7 eggs (plus 1 to brush the surface)

450 gr. sugar

110 gr. extravirgin olive oil

50 gr. butter

50 gr. mint liqueur

50 gr. maraschino

15 gr. aniseed

1 orange (zest and juice)

First of all dissolve the brewer’s yeast into the warm milk, then gradually add in some flour (about 300-400 grams) and start mixing until well incorporated. Knead it into a ball and put it in a bowl to rest for about 2 hours.

After two hours, mix in 3 eggs, 150 gr of sugar, 40 gr. of olive oil and another 400 grams of flour. Then let it rest again, in a warm place until it doubles the volume (this time will take about three hours).

For the third step, add in 2 eggs, 150 gr of sugar, 40 gr of olive oil, 25 gr of mint liqueur, 25 gr. of maraschino and again 400 gr. of flour. Knead it again until all ingredients are well combined and leave it to rest for another 3 hours.

Finally, mix in the rest of the ingredients and knead it for a while, then give it a final 3 hours rest again.

Divide the batter into 3 equal parts and put them into the baking moulds (we use the same ones as for Panettone). Put the moulds in a warm place covered, and let them rise for 4-5 hours, or until the double their volume.

Brush the top of the cakes with the beaten egg and then bake in a preheated oven at 180° C for about 50 minutes, or until the surface becomes brown. Leave them in the oven to rest for 10 more minutes and then let them cool completely before serving.

You can keep the cakes in a plastic bag, in a cool dry place for up to one week, so you can actually bake more pieces and offer them to family and friends as an Easter gift, or you can just have a wonderful breakfast everyday for a whole week! Enjoy!tuscan-traditional-easter-cake-buona-pasqua

P – for Pasta: fresh, handmade & delicious

Raise your hand if you’re a homemade pasta lover!

One thing I have noticed throughout the years, is that usually making fresh pasta is the favorite part of my cooking classes for our guests. I mean, let’s admit it, everybody loves the italian-style fresh pasta, and if you’re visiting Italy, pasta is one of the reasons why you’re here! So delicious, savory and somewhat chewy, fresh pasta can be complemented with almost everything from cheese to vegetables, meat, fish and even chocolate! Plus, if cleverly accompanied by the right wine, it makes the perfect Italian meal.

It’s been decreed one of the healthiest and most nourishing dishes worldwide, as part of the mediterranean diet, so why be limited to just eating pasta at the restaurant every once in a while, when you can make it from scratch at home, whenever you wish.

Now, I know from my experience that cooking a dish of fresh pasta could sound rather intimidating for those who’ve never tried before, or have only seen it on TV. But I have some good news for you all, and according to my experience again, I can guarantee you that even a ten-year-old can do this, and you’ll never go back to buying fresh pasta again.

There’s something magic about making pasta at home the old way, that no one has yet managed to figure out. I myself have been doing it for years now, and every time I still have fun just like the old days.

It could be the marvel of feeling the dough coming together between your hands, or maybe the relaxing process of kneading and shaping, but as soon as you get your hands on and start doing it, you’d never want to stop. Then as you go, your fantasy gets lighten up and you begin experimenting all different kind of shapes and fillings for your dough, and before you know it, you find yourself inviting your friends over for a meal and getting all the compliments and “aaaw”s and “oooh”s for your fresh Italian-style dishes.

It can get really fun and become a social activity to share with your kids too; and don’t worry about the flour dust, streaked aprons and flaky bits of dough crusted on the kitchen counter. It doesn’t have to be a demanding work, so don’t loose heart if you don’t get it the first time. Just go for it and then keep trying. All you need is “an open heart and a positive attitude”, as my son Luca always says to our guests.

pasta-fresh-handmade-flour

We don’t need another pasta recipe

If you google fresh pasta you’ll find loads of recipes and every one will be different from the others, because every family has its own tradition when it comes to making pasta. So my intention isn’t just to give you one more fresh pasta recipe, but rather some helpful tips that I always share during my cooking classes.

My guests always appreciate the little tricks and tips I reveal and become more confident as they go, letting loose and having so much fun, which in the end, is the main purpose of this experience, don’t you agree?

So what’s really important is to have the right type of flour. My fail-proof recipe is based on the high-protein, finely milled “00” wheat flour, but if you have issues finding it, you can just go with the plain flour, or mix 2 parts of it with 1 part of semolina flour: this will add that slightly rougher texture that’ll help seasonings stick better to your pasta.

On a wooden or marble counter, start building a so-called “fountain” and break the eggs right in the middle, making sure they are well contained by the flour around them. Then add just a pinch of salt and a sprinkle of extravirgin olive oil. Use a fork to break the eggs and start mixing them reaaally slow, keeping everything inside the flour fountain, until everything is fully incorporated and you get a smooth uniform texture.

Now here comes the fun part! I know in modern times you may be used to getting things done quickly and with an extra help from your stand mixer, but kneading by hand is another story. It really makes you feel the dough coming together and it somehow connects you to the whole process. All you have to do is press and push with your wrist, then fold the dough over and again press and push. Just go ahead and knead it like this until it’s smooth and firm, it’ll take no more than 10-12 minutes.

Using hands gives you the chance to check when your pasta dough is ready – if you feel it’s still sticky, just dust the counter with more flour and keep kneading until firm and dry.

Another important step in making pasta, is to give your dough the necessary time to relax and loose elasticity; that’ll keep it from shrinking or pull back as you stretch it, making it easier for you to roll it flat and shape it. Let’s say about 10 minutes at room temperature, covered by a cotton cloth, should be enough. This’ll also give you the time to reorder the kitchen counter and prepare the pasta machine for shaping, or get the filling ready if you’re into making filled-pasta.

Common forms of fresh pasta have long shapes, such as tagliatelle, fettuccine, spaghetti, linguine or our specialty Tuscan pici, flat shapes such as maltagliati, or sheets for lasagna, short shapes like orecchiette, cavatelli, farfalle, trofie and filled or stuffed shapes such as cannelloni or ravioli, cappelletti and tortellini.

Of course Italy has a very deep-rooted tradition for pasta dishes, and that is why every region has its own traditional pasta shapes and names, that can be totally different from the common ones you are used to. I always suggest to search for and taste the local and regional specialties while visiting any part of Italy, because you’ll never find the same dish cooked alike from one place to another.

Cutting the pasta in the desired shape is also an important part of the process, as you have to pay attention to spread it as thinly as possible and always keep some flour handy, so you won’t get a sticky bundle instead of your tagliatelle nest… I always say to my guests, we want them to be fluffy, fluffy, fluffy, it makes them laugh a lot, but in the end is the one thing they remember the most. So to get that, you need to sprinkle some flour over the shaped pasta and then jiggle it with your hands.

When making filled pasta like ravioli, the most important trick is to press the edges well with your fingertips or a fork to seal the dough, so they won’t open while boiling. And of course, flour again to prevent them from sticking together when cooked.

If you’re not cooking pasta immediately, just let it dry on a baking sheet for a few minutes, sprinkled with flour, then fold it gently to form the nests. You can let it dry some more and then wrap it up and store in the fridge for no more than 2 days. However, I do advise you to taste it fresh, as you make it.

Cooking pasta is another important step of the process, as you need to pay attention to the time: it will only take 5-7 minutes to cook fresh pasta, unlike the dried one, which needs considerably more boiling. Dip your shaped pasta into a pot of plentiful salted boiling water and add just a touch of olive oil, so the strands won’t stick together. For fresh filled pasta, always use a gentle flame and keep the water simmering instead of boiling, so your ravioli won’t break.

One more thing that I always recommend, is to taste everything you cook; so to make sure it has reached the perfect cooking poin and has a good balance with the salt, just pick a piece of boiling pasta with a fork or some tongs, and give it a bite. Careful though, don’t get burned!

Needless to say that pasta is at its best when cooked “al dente”, so as soon as you feel it’s tender but still firm when bitten, just drain it. At this point, you should keep the sauce or chosen condiment on hand, because pasta needs to be seasoned and stir-fry immediately.

Now all you need is your family and friends gathered around the table and a good glass of wine to go with your wonderful fresh homemade pasta. Enjoy!